 how-to
Managing Multiple Vendor Schedules Effectively
Table of Contents
- Step 1: Build a Centralized Vendor Database and Schedule
- Step 2: Use a Vendor Schedule Template to Standardize Coordination
- Step 3: Choose Vendor Scheduling Software That Fits Your Operation
- Step 4: Apply Vendor Coordination Best Practices to Prevent Conflicts
- Step 5: Map Every Vendor Project Timeline and Track Performance
- Step 6: Plan for Contingencies and Measure Schedule Success
- Frequently Asked Questions
Last Updated: October 14, 2026
Step 1: Build a Centralized Vendor Database and Schedule
Managing multiple vendor schedules effectively starts with one shared source of truth for those vendor schedules. A central vendor database is the fix.
A vendor database is a single record of every vendor you work with, including their contacts, rates, availability, and past performance. Without it, your team juggles spreadsheets, emails, and phone calls for every booking.
What to Track for Each Vendor
- Company name, contact person, phone, and email
- Service type and coverage area
- Standard lead time and turnaround window
- Rates, invoicing terms, and payment method
- Insurance, license, and compliance documents
- Availability windows and blackout dates
- Past performance notes and quality scores
Store everything in one place your whole team can access. When a unit needs a fast turnaround, you should not be hunting for a phone number.
Step 2: Use a Vendor Schedule Template to Standardize Coordination
A vendor schedule template is a reusable layout that captures every job, time slot, and vendor in the same format. Standardizing the format means anyone on your team can read the schedule without asking questions.
A good template includes:
- Date and time slot for each service
- Vendor name and assigned contact
- Property or unit identifier
- Scope of work and any special notes
- Status column: scheduled, in progress, complete
- Buffer time between overlapping jobs
Build it once in a spreadsheet or your project tool, then copy it for each week or project. Consistency beats cleverness here. A plain template everyone uses wins over a fancy one nobody understands.
Step 3: Choose Vendor Scheduling Software That Fits Your Operation
Vendor scheduling software is any tool that lets you assign jobs, share calendars, and track vendor status in one place. The right choice depends on your volume, team size, and how many properties you manage.
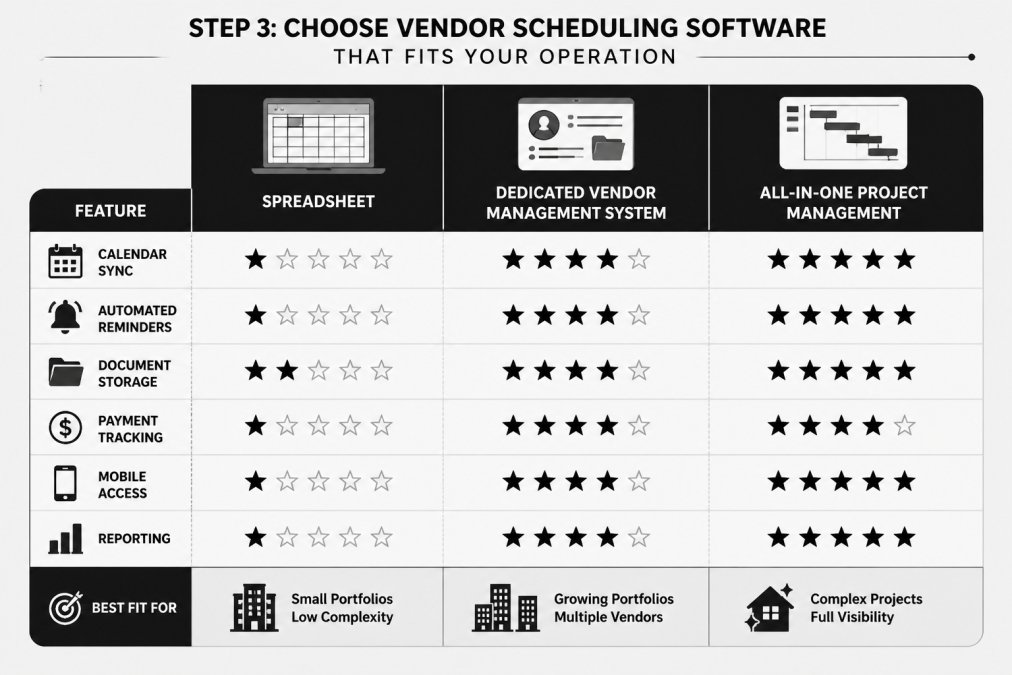
There are three common options. Each fits a different operation.
| Tool Type | Best For | Key Features | Watch Out For |
|---|---|---|---|
| Spreadsheet | 1-3 properties, low volume | Manual entry, shared file, free | Breaks down past ~20 vendors |
| Dedicated vendor management system | 5+ properties, high volume | Calendar sync, reminders, document storage | Higher cost, setup time |
| All-in-one project management | Teams already using one tool | Tasks, timelines, mobile access | Vendor-specific features are limited |
Match the tool to your real workload. Buying an enterprise system for three vendors wastes money. Running forty vendors on a spreadsheet wastes time and invites mistakes.
Step 4: Apply Vendor Coordination Best Practices to Prevent Conflicts
Vendor coordination best practices are the habits that keep overlapping schedules from turning into chaos. The goal is simple: no two vendors need the same space, access, or contact at the same time. Most guides stop at a checklist. What actually prevents conflicts is a repeatable workflow you run every time two or more vendors touch the same window.
Run the Four-Pass Conflict Check
Before you publish any weekly schedule, run these four passes in order. Each pass catches a different class of collision.
- Time pass. Sort every job by start time. Flag any pair with less than your minimum buffer (a common default is 30 minutes for light trades, 2 hours when equipment or elevators are shared).
- Space pass. Group jobs by property, building, floor, or unit. Flag any two vendors assigned to the same physical zone in overlapping windows.
- Access pass. List who needs keys, gate codes, elevator reservations, or dock time. Flag any shared access point with two bookings inside the same hour.
- Dependency pass. Mark tasks that cannot start until another finishes, cleaning after paint dries, inspection after install, final walk after cleaning. Flag any dependent task scheduled before its predecessor's realistic finish.
Anything flagged in a pass gets one of three resolutions: shift (move one job), stack (sequence them with an explicit handoff time), or split (divide the zone so crews work opposite ends). Write the resolution on the schedule so the next person understands why the times look the way they do.
Set the Coordination Rules That Hold
- Assign one internal point of contact per project. Two contacts means zero accountability.
- Confirm every booking in writing 48 hours ahead, and re-confirm the day before for anything on a critical path.
- Share access codes and keys only with vendors on the current schedule, and rotate codes after each project.
- Group vendors by zone so crews do not cross paths, and publish the zone map with the schedule.
- Publish the weekly schedule every Friday for the coming week, with a locked version and a change log.
- Flag dependencies up front, not the morning they bite you.
Handle Time Zones and Working Hours
Time zones and working hours matter when you use regional or national vendors. Confirm the vendor's local start time, not yours, and note both on the schedule. A missed time zone is an easy way to lose a day. Two habits prevent most of these errors:
- Store each vendor's time zone and working hours in the vendor record, and let the calendar tool convert automatically rather than converting in your head.
- For any vendor more than one zone away, put the confirmation in writing with the time zone spelled out (for example, "9:00 a.m. Eastern / 7:00 a.m. Mountain") so nobody guesses.
One point of contact per project is the single biggest fix. When three people book the same vendor, double-bookings follow. Centralize the communication, run the four-pass check before publishing, and conflicts drop fast.
Keep a one-line "conflict log" for each week: date, vendors involved, cause, resolution. After a month you will see the same two or three causes repeating, and you can fix the template instead of firefighting.
Step 5: Map Every Vendor Project Timeline and Track Performance
A vendor project timeline shows each task in order, with start and end dates, so you can see how one vendor's work affects the next. Map it before the project starts, not after.
Build the timeline in four steps:
Request Walk Thru Estimate Today →
- List every task and the vendor who owns it
- Set start and end dates for each task
- Mark dependencies, like cleaning that must follow construction
- Add a buffer day between linked tasks
Then track performance against the plan. Key metrics to watch:
| Metric | What It Measures | Target |
|---|---|---|
| On-time arrival | Vendor shows when scheduled | 95%+ |
| Schedule adherence | Jobs finish within the window | 90%+ |
| Response time | Hours to confirm a booking | Under 24 |
| Rework rate | Jobs needing a return visit | Under 5% |
Review these monthly. Vendors who miss targets repeatedly need a conversation, not another booking.
Step 6: Plan for Contingencies and Measure Schedule Success
Contingency planning means having a backup ready before a vendor cancels, runs late, or hits an urgent change. Every schedule needs a Plan B, and a written path for when to use it. The difference between a smooth recovery and a lost day is whether you decided the escalation steps in advance.
Build a Three-Tier Backup List
For each service type, list backups in three tiers so you know who to call first:
- Tier 1, Same-day, same-scope. Vendors who already know the property and can take rush work. Target response: under 4 hours.
- Tier 2, Next-day, same-scope. Vendors who need a day of notice but can cover the full scope. Target response: under 24 hours.
- Tier 3, Partial or split coverage. Vendors who can take part of the job, or two vendors who together cover it. Use when no single backup is available.
Note each backup's rush policy, after-hours rate, and how fast they actually respond, not how fast they say they will. Update the list quarterly, because vendor capacity changes.
Use a Rescheduling and Escalation Protocol
When something breaks, follow the same steps every time so nobody improvises under pressure:
- Confirm the change. Get it in writing from the vendor: what slipped, by how long, and why.
- Assess the critical path. Does the delay block a dependent task, a resident move-in, or an inspection? If yes, escalate immediately; if no, reschedule within the week.
- Notify affected parties within one hour. Property contact, other vendors in the same zone, and anyone waiting on the output.
- Activate the backup tier. Call Tier 1 first; if no answer within the response window, move to Tier 2 without waiting.
- Log the cause and the fix. Feed it into the conflict log so the same failure does not repeat.
Set a clear escalation trigger: any delay over 2 hours on a critical-path task, or any cancellation inside 24 hours, goes straight to the project lead. Everything else can be handled by the point of contact.
Measure Schedule Success with Defined KPIs
Measure success with a few clear numbers, each with a definition so the whole team counts the same way:
| Metric | Definition | Target |
|---|---|---|
| On-time completion | Jobs finished within the scheduled window | 95%+ |
| Schedule adherence | Jobs that did not require a reschedule | 90%+ |
| Response time | Hours from booking request to written confirmation | Under 24 |
| Conflict rate | Overlapping bookings caught per 100 scheduled jobs | Under 5 |
| Backup activation rate | Jobs covered by a backup vendor per quarter | Track trend, not a fixed target |
| Average delay | Hours of slippage per project | Trending down |
Review these monthly. If on-time completion and adherence hold steady but the conflict rate climbs, your template or buffer times need work. If backup activation climbs, your primary vendor capacity is the problem, not your process.
A backup list you never test is not a backup list. Call one Tier 1 vendor per quarter with a real or simulated rush request so you learn their true response time before you need it.
For property teams facing tight turnover windows, a cleaning partner who coordinates directly with your other crews removes a whole layer of juggling. Turnover Apartment Cleaning builds dedicated project coordination into every job, so turnovers and post-construction cleanups stay on track. As a supplier partner with the Apartment Association of Metro Denver, we handle the handoff so your team is not stuck playing middleman between vendors.
Keep a shared "who to call" list with two backups per service, sorted by tier. When a vendor cancels at 7 a.m., you want the answer in your hand, not in your inbox.
Frequently Asked Questions
How do you coordinate schedules between multiple vendors?
Start by centralizing all vendor availability, lead times, and contact information in one shared calendar or vendor management system. Use a vendor schedule template to assign clear time slots and flag dependencies, such as cleaning after construction. This approach reduces calendar conflicts and keeps everyone aligned on priorities.
What should a vendor schedule template include?
A effective vendor schedule template includes vendor name, service type, project address, start and end times, on-site contact, access instructions, dependencies on other vendors, and payment terms. Add columns for confirmation status and completion notes. For multi-site operations, include a column for property or unit number. Templates work best when they are shared in real time and tied to a calendar that vendors can view or sync with their own.
How do you handle a vendor who misses a scheduled deadline?
Document the missed deadline immediately and contact the vendor to understand the cause. If the delay affects other vendors, notify them right away and adjust the schedule. For recurring issues, review the service-level agreement and consider a backup vendor for critical tasks. Track on-time delivery rates for each vendor so you can make data-driven decisions about whether to continue the relationship or replace them.
What tools can help manage multiple vendor schedules?
Options range from shared spreadsheets and Google Calendar to dedicated vendor scheduling software and full vendor management systems. For property management teams, tools that integrate with existing property management software and offer mobile access for on-site updates work best. Look for features like automated reminders, document storage for contracts and insurance, and reporting on schedule adherence. The right choice depends on your volume and how many vendors you coordinate regularly.
Coordinating many vendors across many properties is hard, and one late crew can cost you a showing or a lease. Squeaky Clean Plus takes that pressure off with dedicated project coordination, fast turnover cleaning, and post-construction cleanup built for tight handoffs. We keep every space ready for the next tenant or phase. Start an estimate with Squeaky Clean Plus and get your schedule back under control.