 ultimate-guide
Post Construction Cleaning Checklists 2026
Table of Contents
- Why a Phased Post Construction Cleaning Checklist Beats One Big Clean
- Post-Construction Cleaning Timeline: How the Phases Fit Your Schedule
- Phase 1: Rough Cleaning and Debris Removal
- Phase 2: Detailed Cleaning, Dust Control, and Material-Specific Methods
- Post-Construction Cleaning Checklist for Apartments and Unit Turnovers
- Post-Construction Cleaning Inspection Checklist and Sign-Off Standards
- Free Post-Construction Cleaning Checklist Template (Printable)
- Conclusion
- Frequently Asked Questions
Last Updated: October 13, 2026
Why a Phased Post Construction Cleaning Checklist Beats One Big Clean
A post-construction cleaning checklist is a phased, task-by-task document that guides a crew from rough debris removal through final detailing before an owner walkthrough. Treating cleanup as a single event is a common mistake.
The problem with one big clean is sequencing: detail cabinets before drywall sanding finishes and you clean the same surface twice. A phased checklist assigns each task to the moment it makes sense, protecting your labor budget and walkthrough date.
Below, we break down each phase, what belongs on a room-by-room checklist, and how to run a sign-off inspection that holds up. The post construction cleaning checklists in 2026 that work best share one trait: they're built backward from the handover date.
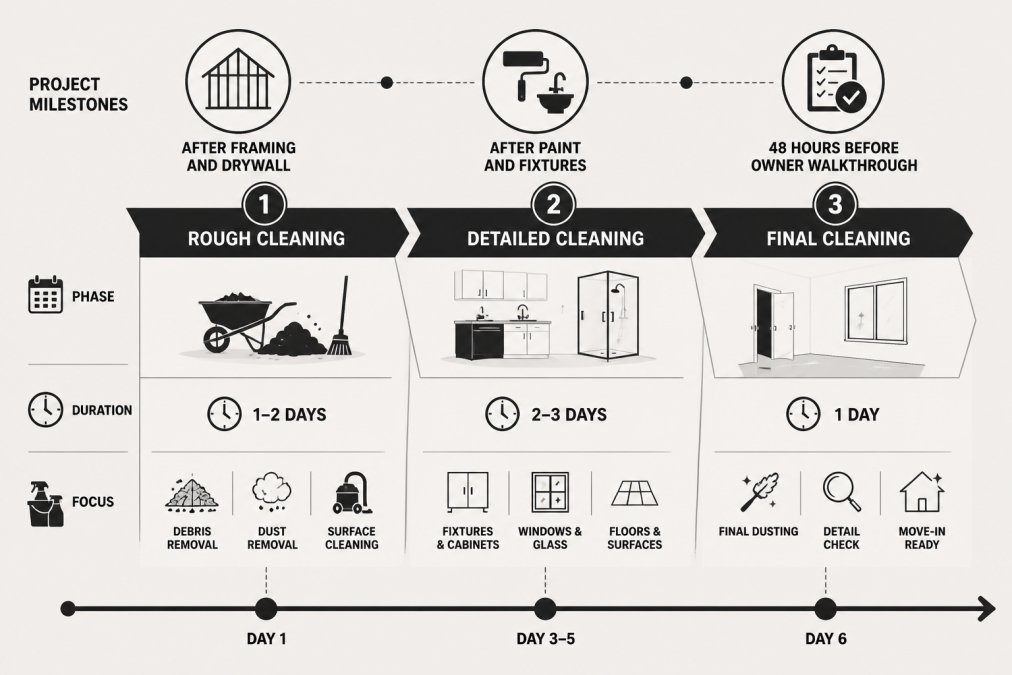
Post-Construction Cleaning Timeline: How the Phases Fit Your Schedule
Curing times set the earliest start. Freshly finished surfaces need time before anyone wipes them. Common manufacturer guidance:
- Grout and thinset: typically 24 to 72 hours before wet cleaning, longer for cold or humid conditions
- Caulk and sealant: usually 24 hours before wiping or exposing to moisture
- Fresh paint: often 7 to 14 days before washing, though a light dust pass is fine sooner
Cleaning before the cure window closes can haze a finish, trap moisture, or void a warranty. Build these waits in as hard stops.
Punch-list work comes before final clean, not after. A punch list is the contractor's list of incomplete or defective items.
Final contractor access is the last gate. Before final clean begins, confirm no trade needs to re-enter the space:
- All inspections (framing, electrical, plumbing, final building) are passed and signed off
- No equipment, ladders, or material stock remains in the unit
- Touch-up paint and caulk are fully dry
A workable sequence for a typical unit:
- Rough clean after drywall and framing trades clear the space (1-2 days)
- Detailed clean after paint, cabinets, and fixtures are installed, respecting cure windows (2-3 days)
- Punch-list closeout and inspection sign-off (contractor-controlled)
- Final clean in the last 48 hours before the owner walkthrough (1 day)
- Owner walkthrough and cleaning sign-off
Coordination mechanics that prevent collisions:
- Get a written schedule from the general contractor showing each trade's completion date, not a verbal estimate
- Hold a short pre-clean walk with the site superintendent to confirm which zones are released
- Build a buffer day between detailed clean and final clean to absorb punch-list surprises
A common pattern: the final clean gets booked the moment paint looks dry, then pushed twice because the painter returns for touch-ups.
Phase 1: Rough Cleaning and Debris Removal
Rough cleaning is the first pass: hauling out construction debris, scrap materials, and packaging before any detail work begins. Crews sweep floors, bag loose trash, and remove large items so the detailed phase can reach surfaces.
Start at the top of the unit and work down. Bag debris where it was generated rather than dragging it through finished spaces, and stage a single haul-away point near the exit.
- Remove all construction debris, scrap materials, and packaging
- Sweep and bag loose debris room by room
- Pull and dispose of protective film and stickers on windows
Waste Handling and Environmental Practices
Waste handling separates a professional crew from a quick sweep. Sort recyclables like cardboard, metal offcuts, and clean packaging from general construction waste, and check local disposal requirements before haul-away day. Many municipalities restrict what goes in a standard dumpster, and paint, solvents, and adhesives usually need separate handling.
Phase 2: Detailed Cleaning, Dust Control, and Material-Specific Methods
Detailed cleaning is the second pass: removing fine dust from every surface, cleaning fixtures and glass, and matching your method to the material. Here a HEPA vacuum and microfiber cloths matter more than elbow grease.
Fine dust settles everywhere, including inside cabinets, on top of door frames, and along baseboards. A HEPA vacuum captures particles a standard shop vac pushes back into the air; follow with microfiber cloths and a surface-matched cleaning solution.
Material-specific methods make the difference on finishes:
- Glass and windows: Remove stickers and protective film first, then clean with a streak-free solution and a squeegee.
- Cabinets and countertops: Vacuum interior dust before wiping; abrasive pads scratch laminate and stone.
- Baseboards and trim: Wipe after floors are vacuumed, not before, so dust doesn't redeposit.
Dust Containment and Indoor Air Quality
Dust containment protects indoor air quality during and after the clean. Seal doorways with plastic sheeting during rough work, run HEPA filtration, and replace HVAC air filters once detailed cleaning is complete, skip the filter change and the system redistributes the dust you just removed the first time the heat runs.
Post-Construction Cleaning Checklist for Apartments and Unit Turnovers
A post-construction cleaning checklist for apartments follows the same three phases but compresses the timeline, because turnover windows are short and leasing agents need units move-in ready fast.
Room-by-room tasks for a typical unit:
- Kitchen: vacuum cabinets inside and out, degrease countertops, clean appliance exteriors, wipe fixtures
- Bathrooms: descale fixtures, clean glass, wipe vanities, mop floors
- Bedrooms and living areas: vacuum carpets, wipe baseboards, clean windows and glass surfaces
For property managers running multiple units, a printable checklist per unit keeps crews consistent and makes missed tasks easy to spot. Squeaky Clean Plus coordinates turnover schedules directly with property teams so units move from construction to move-in ready without a gap.
Post-Construction Cleaning Inspection Checklist and Sign-Off Standards
A post-construction cleaning inspection checklist is the quality-control step: a documented walkthrough confirming every task is complete before the owner handover. Sign-off should be objective, not opinion.
Request Walk Thru Estimate Today →
Define acceptance criteria up front. Vague standards like "looks clean" produce disputes. Workable criteria are observable and repeatable:
- Dust: A clean white cloth or gloved finger wiped along baseboards, window sills, cabinet tops, and door frames shows no visible residue.
- Glass: Viewed at an angle in daylight, windows, mirrors, and glass doors show no streaks, film, fingerprints, or adhesive haze.
- Floors: No visible dust trails, grit, adhesive residue, or missed edges behind doors and under toe kicks; hard floors dry and streak-free.
Run the inspection in a fixed order. Consistency makes results comparable across units and crews:
- Top-down surface pass. Start at ceilings, light fixtures, and high ledges, then work down to baseboards. Dust falls, so checking high surfaces last means re-checking low ones.
- Glass and fixtures. Inspect in daylight with interior lights on. Angle-check every pane and mirror.
- Floors. Check corners, thresholds, and behind doors. Confirm no adhesive residue or missed edges.
- Air quality. Confirm filter replacement and dust-free vents. Note any visible dust in the return air path.
- Punch list. Log every failed item with a location and a photo, assign it to a crew member, and set a re-check time.
Document with photos and a signed checklist. Photo documentation should capture:
- Each room at completion, wide shot
- Any pre-existing damage, before cleaning, so it isn't attributed to the cleaning crew
- Any failed inspection item, with a close-up and a location note
Store the signed checklist and photos with the project file.
Handover sign-off process. A clean sign-off has three signatures or acknowledgments:
- Cleaning crew lead confirms all checklist items are complete and the punch list is resolved
- Cleaning supervisor or QC reviewer independently re-checks a sample of rooms and signs the inspection record
- General contractor or property representative accepts the space at the walkthrough and signs the handover document
If the general contractor or owner flags an item at the walkthrough, log it as a new punch-list entry with a photo, assign an owner, and set a re-clean date.
Common failure points to watch:
- Dust reappearing after the HVAC runs, which usually means filters weren't replaced or vents weren't cleaned
- Streaks on glass that only show in direct sunlight, which means the inspection happened under the wrong lighting
- Missed edges behind doors and under toe kicks, which means the floor pass skipped perimeter detail
Free Post-Construction Cleaning Checklist Template (Printable)
Use this template as a starting point. Copy it into your project file, or print one per unit and check items off as crews complete them.
Phase 1: Rough Cleaning
- Debris, scrap materials, and packaging removed
- Floors swept and loose debris bagged
- Protective film and stickers removed from glass
Phase 2: Detailed Cleaning
- HEPA vacuum run on all surfaces and floors
- Cabinets, countertops, and fixtures cleaned
- Windows, glass surfaces, and mirrors cleaned
Phase 3: Final Cleaning
- Floors mopped and buffed
- Finishing touches on fixtures and hardware
- Final dust pass completed
Sign-Off
- Surface inspection passed
- Punch list items resolved
- Photos taken and checklist signed
Conclusion
The gap between a unit that passes inspection and one that gets flagged usually comes down to sequencing and documentation, not effort. A phased checklist built backward from your walkthrough date keeps debris removal, dust control, and final detailing in order, and a signed inspection record protects everyone at handover.
Frequently Asked Questions
What should I include on my post-construction cleaning list?
A complete post construction cleaning checklist covers three phases: rough cleaning (debris removal, scrap materials, packaging haul-away), detailed cleaning (fine dust removal from every surface, HVAC vents, cabinets, countertops, glass surfaces, stickers and protective film), and final cleaning (floor sweeping, vacuuming, mopping, baseboards, fixtures, and finishing touches). Add a room-by-room checklist, a surface inspection step, and a punch list for defects found during the final walkthrough so nothing gets missed at owner handover.
What is the difference between a rough clean and a final clean?
Rough cleaning happens first and focuses on construction debris: scrap materials, packaging, drywall chunks, and bulk dust. It clears the site so trades can work and inspectors can walk through. Final cleaning comes last, after all trades are gone. It targets fine dust on surfaces, glass, fixtures, cabinets, and floors, and it ends with a surface inspection against the punch list. Skipping the rough clean means the final crew spends hours on debris instead of detail work.
How long does post-construction cleaning take?
Timing depends on square footage, how many trades were on site, and how much dust settled. A single apartment unit typically takes one to two days across all phases. Larger commercial spaces or full home builds can run three to five days. The post-construction cleaning timeline should be written into the project schedule before the last trade leaves, not after. Crews that arrive while painters or electricians are still working end up re-cleaning surfaces.
How do you inspect a property after post-construction cleaning?
Use a post-construction cleaning inspection checklist and walk the unit room by room with a flashlight. Check for fine dust on top of door frames, inside cabinets, on HVAC vents, and along baseboards. Wipe glass surfaces and mirrors for streaks. Run a white cloth across floors and countertops. Note any missed spots or construction defects on a punch list with photos, then schedule a re-clean or trade callback before the owner handover and move-in ready sign-off.
What tools and supplies are needed for post-construction cleaning?
A standard kit includes a HEPA vacuum for fine dust, microfiber cloths, floor sweepers, mops, squeegees for glass surfaces, plastic scrapers for stickers and protective film, and pH-appropriate cleaning solutions for different materials. Crews should wear personal protective equipment: nitrile gloves, N95 masks, and eye protection. For heavy debris removal, add wheelbarrows, contractor bags, and a dumpster. Dust containment plastic and air filters help protect indoor air quality while work is in progress.
Can I find a free cleaning checklist template for post-construction work?
Yes. A printable checklist template should be organized by phase (rough, detailed, final) and by room (kitchen, bathrooms, bedrooms, common areas). Include columns for task, responsible crew member, completion date, and inspection sign-off. Property managers and general contractors can also ask their cleaning vendor for a template tied to the project closeout schedule.
Turnover windows don't leave room for a second attempt. Squeaky Clean Plus handles post-construction and apartment turnover cleaning with dedicated project coordination, so your units move from construction to move-in ready on schedule. As a supplier partner with the Apartment Association of Metro Denver, we work directly with property teams and contractors to keep every handoff on track. Start an Estimate and get your next project scheduled.